RadiusServer
FreeRADIUS in Ubuntu
Khaled Mahmud, April 2022
1. Prerequisite
1.1 Software
- Ubuntu 18 LTS Server
- FreeRADIUS v3: Radius Server
- NTRadPing: For testing radius connection; installed in Windows machines
- Any Adroid-based Radius protocol testing tool (optional)
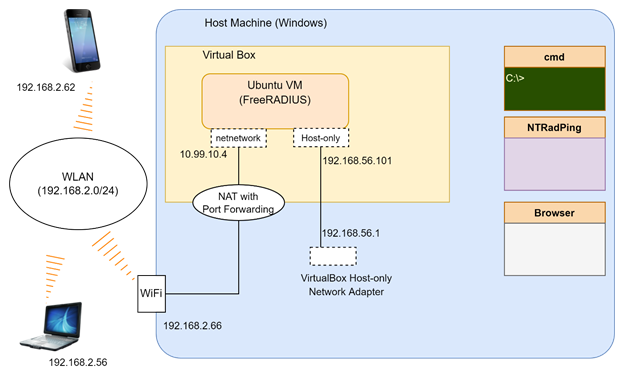
1.2 Topology
To follow along this guide, use Oracle VirtualBox to create the required topology. The topology diagram is given below. As you can see, VirtualBox (VB) is in a windows host machine. I am assuming a clean Ubuntu Server 18.04 LTS installation for FreeRadius installation. You can definitely use other versions of Ubuntu or any other Linux distro. However, for this guide, all the configurations and screenshots are from the Ubuntu server installed in a VM in VirtualBox, as shown.
Figure: Network Topology
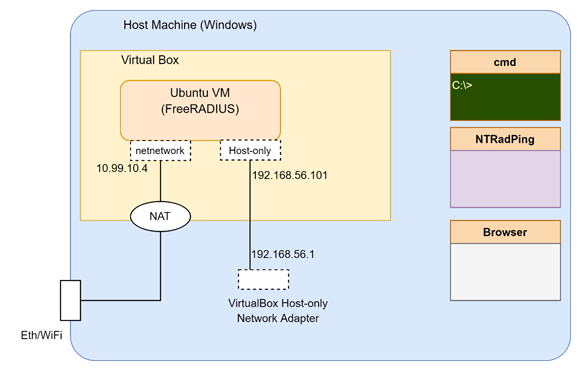
Create a VM with two network interfaces.
- Adapter 1: For connecting to the internet using NetNetwork1 of VirtualBox. If you do not already have a NetNetwork, just create one from the Preference menu of VB. You can use NAT adapter. But I chose to use NetNetwork control the IP subnet and port forwarding.
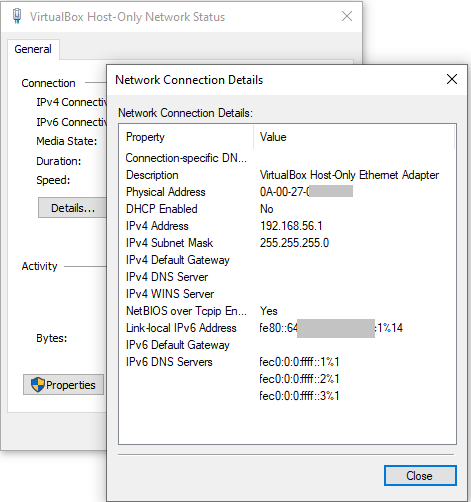
- Adapter 2: For connecting the windows host using Host-Only Ethernet Adapter interface.
Following figures show the network configuration values used in this guide. Your values may be different.
Figure: VirtaulBox NetNetwork settings
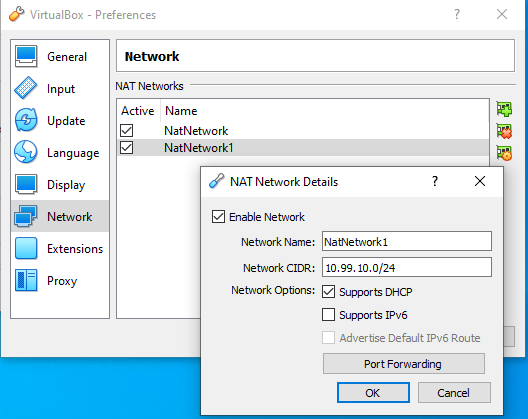
Figure: VirtaulBox Host-Only Ethernet Adapter Settings
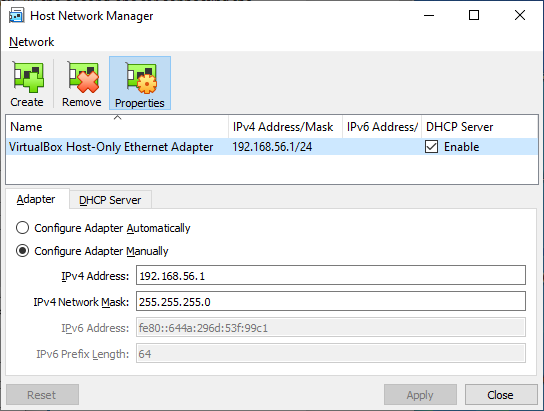
Figure: Host-Only Network Adapter in the Windows Host
Note: I used VirtualBox in this guide. You can use VMWare or any other virtual environment or even bare metal to perform the tests shown in this guide. The network configurations will be slightly different.
1.3 Ubuntu Preparation
1.3.1 Ubuntu Server
Use a clean install of Ubuntu server. I used Ubuntu 18 server. Perform update and upgrade.
sudo apt update
sudo apt upgrade -y
1.3.2 IP Configuration
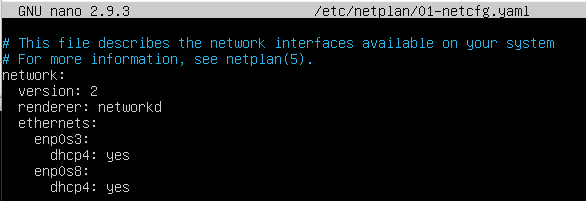
Edit the netplan file of Ubuntu to configure the network interfaces. Enable DHCP on both the adapters. The yaml file for netplan is in /etc/netplan directory. Your netplan yaml file should look similar to this. Use appropriate interface names. Exact name of the file may depend on your Ubuntu installation.
sudo nano /etc/netplan/<netcofig_yaml_file>
network:
  version: 2
  renderer: networkd
  ethernets:
    enp0s3:
      dhcp4: yes
    enp0s8:
      dhcp4: yes
Figure: Sample Netplan Configuration
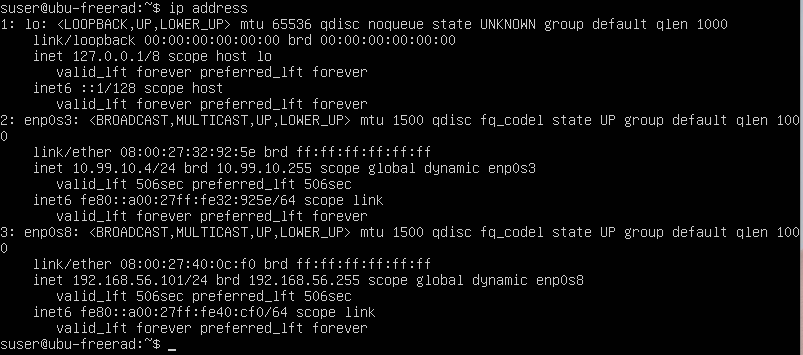
After editing the netplan yaml file, update the interfaces using netplan apply command.
sudo netplan apply
Once edited netplan is applied, the interfaces should have updated IP addresses. Use ip address command to view the interface status. The following figure shows the output from my configuration.
Figure: Ubuntu VM’s Interface IP Addresses
The following table summarizes the IP addresses of the topology. See also the topology diagram above. Again, your values will/may be different.
Table 1: IP addresses in the topology for the example setup of this guide
| Item | Value |
|---|---|
| Windows host, VirtualBox Host-Only Ethernet Adapter | 192.168.56.1 |
| Ubuntu VM, Host-Only Ethernet Adapter | 192.168.56.101 |
| Ubuntu VM, NetNetwork1 Adapter | 10.99.10.4 |
1.4 Test Connectivity
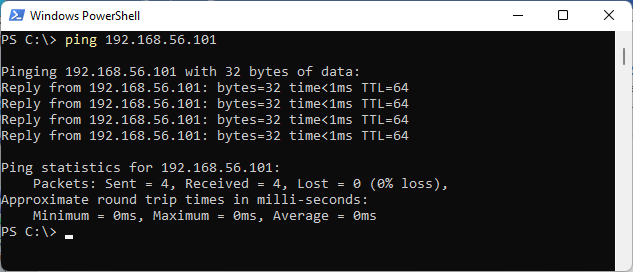
From Windows host, ping the Host-Only Adapter’s IP address of Ubuntu to make sure the host can reach the server.
Figure: Ping from Windows host to Ubuntu VM
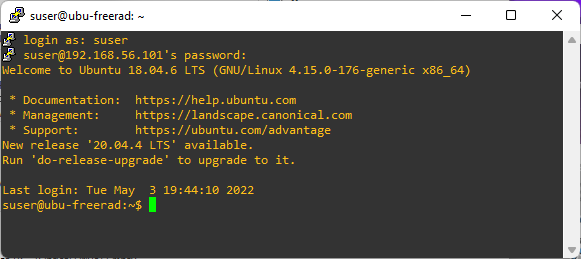
Once you have access to the server from Windows, you can use SSH (e.g., using Putty) to logon to server to perform the rest of the configuration and testing activities.
Figure: Putty Access to Ubuntu VM from Windows Host
2. FreeRADIUS
2.1 Install FreeRADIUS Server
Install freeRadius server in Ubuntu VM.
sudo apt-get install freeradius
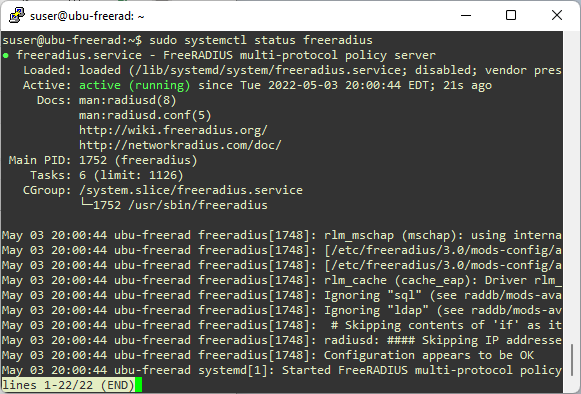
Once the installation completes, FreeRadius server should be already running. Use sudo systemctl status freeradius command to see the status of the service.
Figure: Running Status of FreeRadius Server
2.2 Basic Configuration
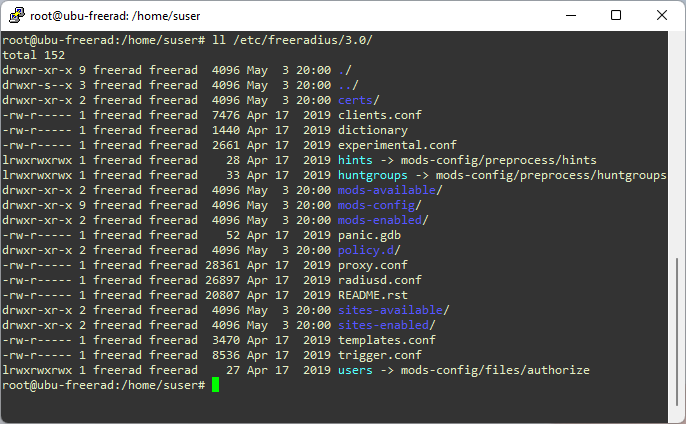
Configuration files of FreeRadius are stored in /etc/freeradius/3.0 directory. Here is the list of contents of the directory.
Figure: Contents of Configuration Directory
2.2.1 Client (NAS) Configuration
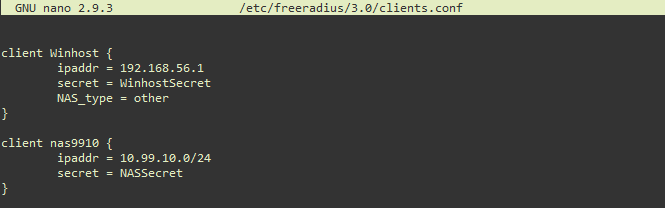
Information about radius clients (AKA Network Access Server, NAS) are stored in /etc/freeradius/3.0/clients.conf file. Note that according to IEEE802.1X protocol, the authenticator is the radius client.
In freeradius, information about radius clients (Authenticators or Network Access Servers or (NAS)) are configured in clients.conf file.
Edit clients.conf file to add localhost as a NAS with the following values. By default localhost entry should already be there in the client.conf file.
client localhost {
    ipaddr = 127.0.0.1
    secret = testing123
    NAS_type = other
}
To allow the Windows host to access the radius server (for testing) add another client entry, as below.
client Winhost {
    ipaddr = 192.168.56.1
    secret = WinhostSecret
    NAS_type = other
}
To allow a client from the 10.99.10.0/24 subnet (NetNetwork1, see the topology diagram), add one more entry. Notice that ipaddr value is a range, not a specific IP address. This means any host from this range can make access request to the radius server.
Figure: Sample Clients (NAS) in clients.conf File
2.2.2 User Configuration
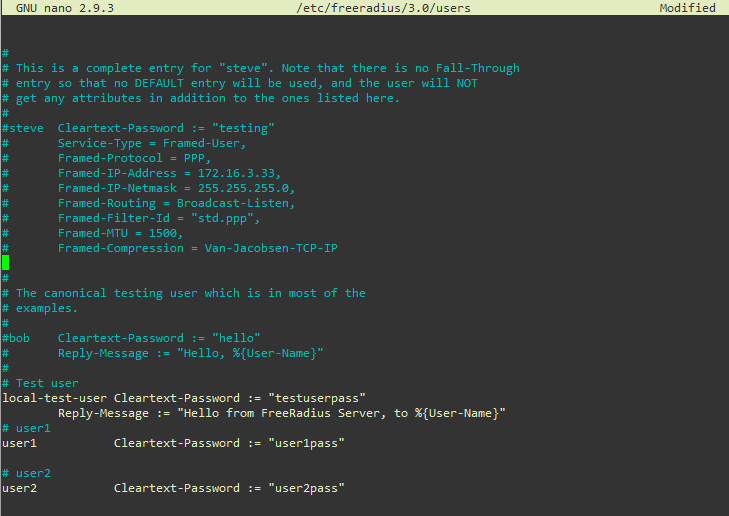
Radius users are configured in /etc/freeradius/3.0/users file which is the local database. Note that according to IEEE802.1X protocol, the supplicant is the radius user.
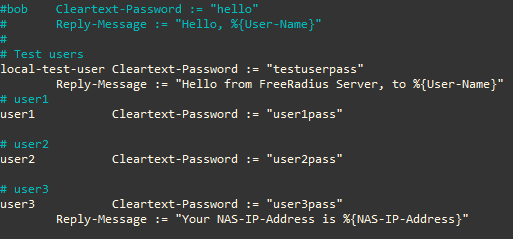
Edit users file to add a few test users with these values.
local-test-user Cleartext-Password := "testuserpass"
                Reply-Message := "Hello from FreeRadius Server, to %{User-Name}"
user1 Cleartext-Password := "user1pass"
user2 Cleartext-Password := "user2pass"
Notice the particular formatting structure of users configuration file. Refer to the online man pages for details. You can also study the examples given in the users file. Here is a screenshot of the users file after adding the test users.
Figure: Sample Users in users File
2.2.3 Restart the Server
For any changes in the clients.conf or users files to take effect, the server must be restarted.
sudo systemctl restart freeradius
💡 You can verify the status of the server using sudo systemctl status freeradius command.
2.3 Test the Server
Now you can test the radius server with the configures done so far. Let us verify if the radius server is accessible from the permitted clients, and the server accepts requests from configured users.
2.3.1 Using Built-in Tool
Freeradius comes with a command line test tool called radtest. Use the tool to test the client and users as shown below.
Figure: radtest Usage
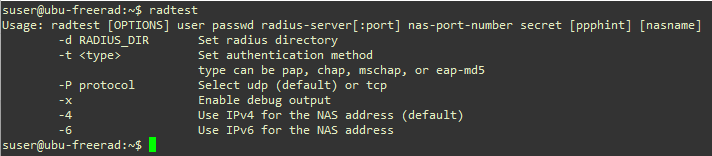
Figure: Test Result for local-test-user
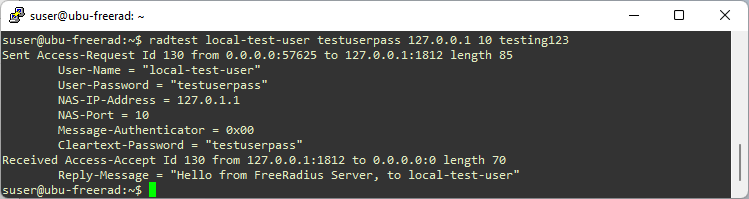
Figure: Test result for user1
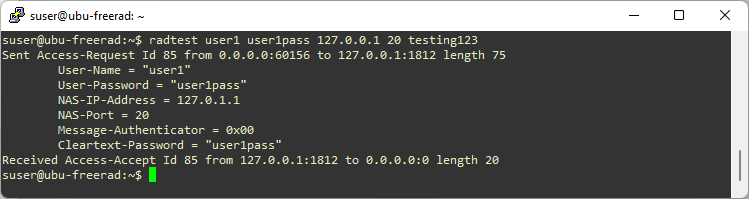
Note that these tests are run from the same host where freeradius is installed. That is why the NAS-IP-Address (i.e. the client IP address) is 127.0.0.1 (localhost). We configured the clients.conf file to allow access from localhost.
💡 After successful testing, you can remove the local-test-user.
2.3.2 Test Radius Server From Windows
In the Windows host PC, we can run a radius protocol testing tool, called NTRadPing. In this test scenario, the host PC is the NAS (as we configured earlier in clients.conf file). We can test the Authentication Request for the users we created.
Here is the result for user1. You should see a response of Access-Accept.
Figure: Successful Access Request

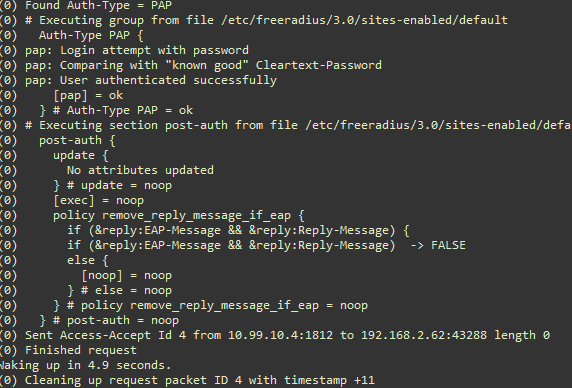
2.3.3 Running Free Radius Server in Debug Mode
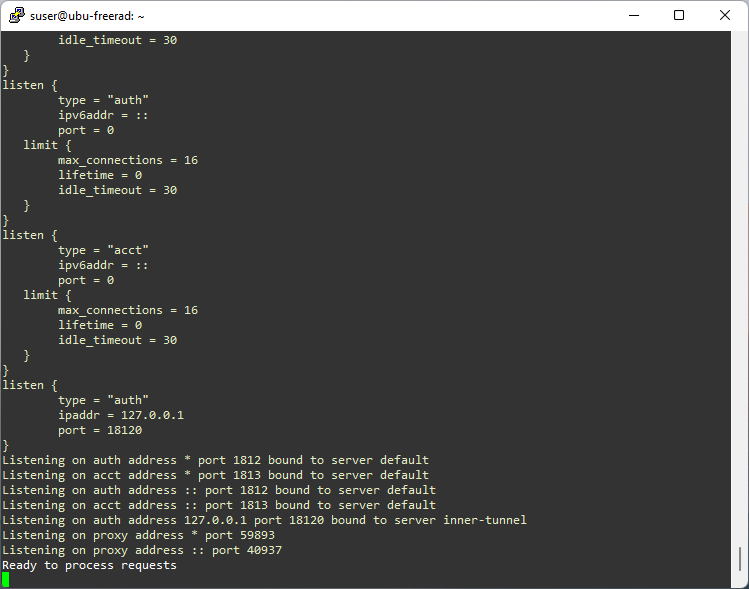
Freeradius can run in debug mode. First stop the service if it is already running using the command sudo systemctl stop freeradius. Then start the server in debug mode using the command sudo freeradius -X. The server will start with a display similar to the following figure.
Figure: FreeRadius Running in Debug Mode
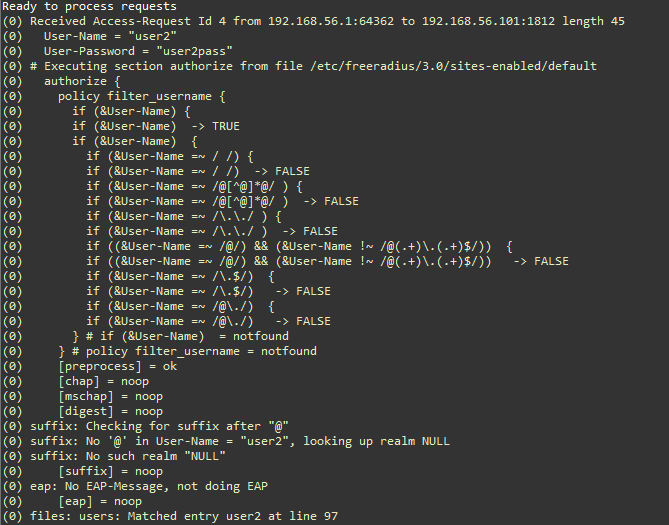
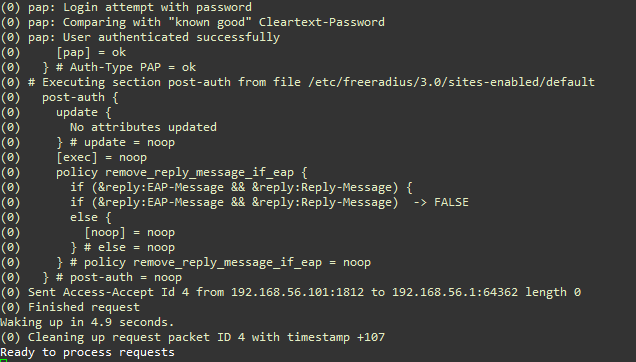
In the debug mode, the console displays information regarding incoming request and server’s responses. The following two figures show an authentication request from user2, with PAP (Password Authentication Protocol) as authentication method. Notice the client’s IP address.
Figure: Access Request (PAP) Test
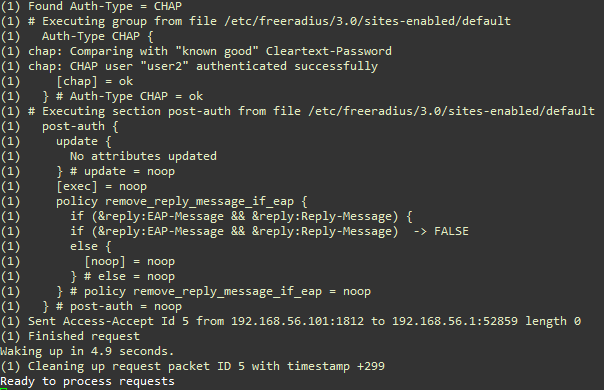
The following figrure is for a request from user2, using CHAP (Challenge Handshake Authentication Protoocl). Notice the detected password.
Figure: Access Request (CHAP) Test
2.3.4 Protocol Format Details
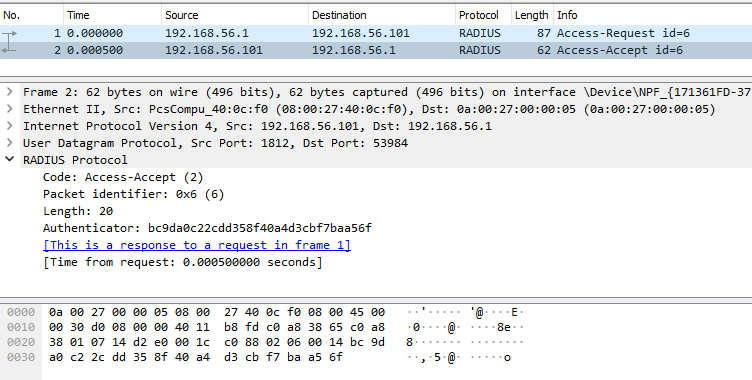
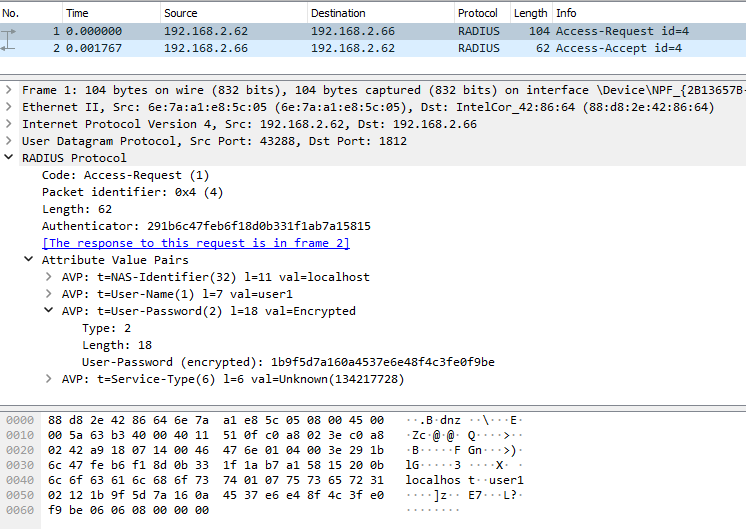
While sending test authentication requests, you can capture radius procotol frames in Windows host using wireshark.
The the following two figures are the wireshark captures showing the details of Access-Request and Access-Accept frames corresponding to a PAP-based authentication request from user2.
Figure: Wireshark Capture of Authentication Request/Reply (PAP)

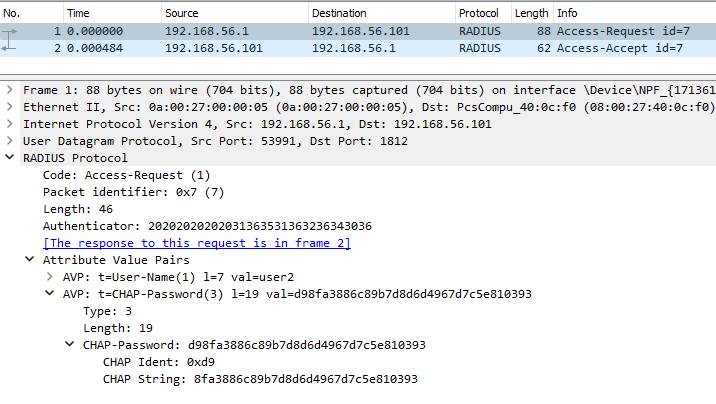
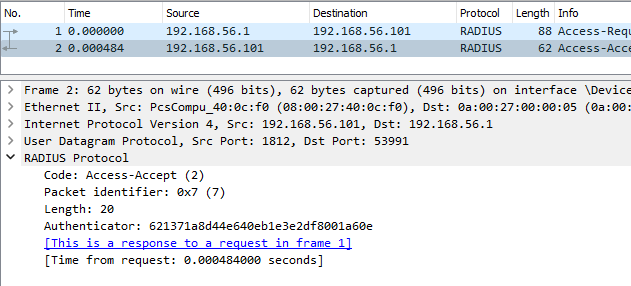
The following two figures are the wireshark captures showing the details of Access-Request and Access-Accept frames corresponding to a CPAP-based authentication request from user2.
Figure: Wireshark Capture of Authentication Request/Reply (CHAP)
3. Port Forwarding for VM-based Radius Server
As we saw in the previous section, windows host can access the radius server using the host-only interface. However, any host from outside cannot access it as the ubuntu VM is running behind a NAT.
Let us enable port forwarding in VitualBox to allow external hosts to access the radius server port in the VM. The eventual topology is given below. In this topology, after port forwarding enabled, hosts in 192.168.2.0/24 LAN should be able to access the VM’s radius server port.
Figure: Topology to Allow Access From Outside
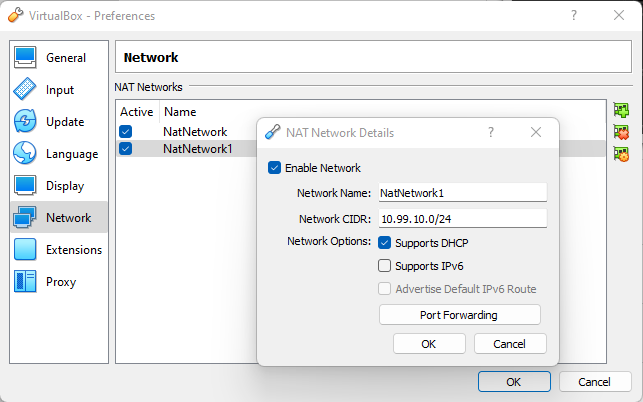
To enable port forwarding in NetNetwork1, configure Port Forwarding in NAT Network Details of NetNetwork1. See the figure below.
Figure: NetNetwork Configuration
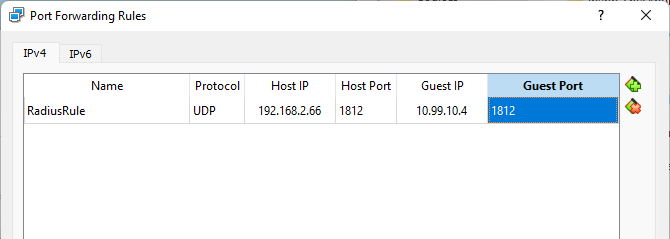
Add a forwarding rule, as shown below. Notice that the freeradius server is running on port 1812 for authentication access requests. The transport protocol is UDP. For this guide we are not forwarding accounting port, which is 1813.
Figure: Port Forwarding Rule Congifuration in VirtualBox
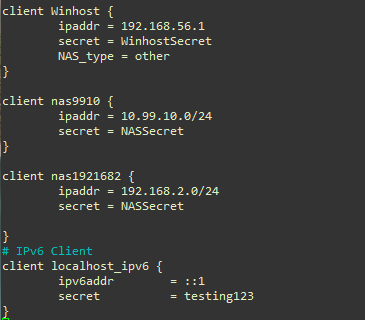
To allow hosts from 192.168.2.0/24 network (see the topology above), add a client entry in the clients.conf file, as shown below. This entry allows any IP address from the whole subnet.
client Winhost {
        ipaddr = 192.168.56.1
        secret = WinhostSecret
        NAS_type = other
}

client nas9910 {
# Whole subnet is specified here. Any VM running in the subnet is allowed
        ipaddr = 10.99.10.0/24
        secret = NASSecret
}

client nas1921682 {
#Whole subnet is allowed here.
#Any host running in the subnetted can access
#You can specify just one IP address
        ipaddr = 192.168.2.0/24
        secret = NASSecret
}
Here is the relevant part of the file after the change.
Figure: clients.conf File
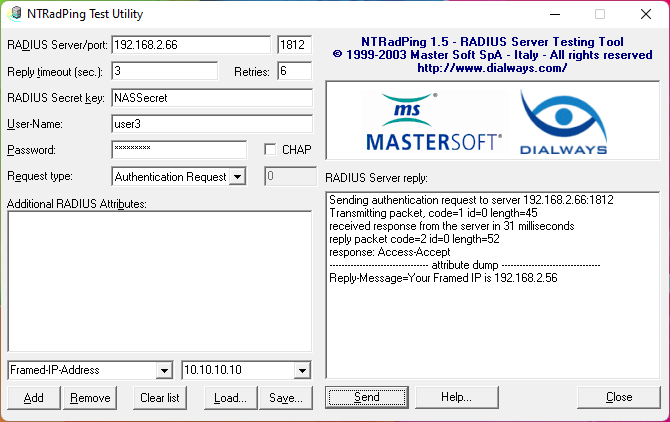
For the sake of testing, add a new user, user3, in the users file. Notice that the server will return a Reply-Message after successful authentication of user3.
Figure: users File with user3 Added
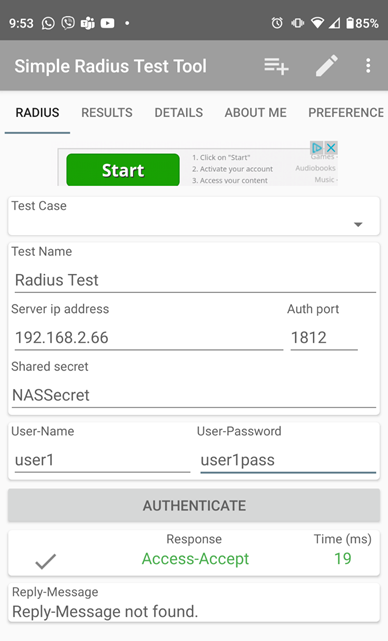
You can use any device and any radius client software to test the server from 192.168.2.0/24 subnet. The following figure shows successful access from an Android device, using Simple Radius Test Tool. Corresponding wireshark captures and freeradius debug outputs are also shown.
Figure: Adroid Client
Here is the result of a successful access request from another windows host (see the topolgy above) in 192.168.2.0/24 subnet. This time user3 was used to make the request.
Figure: Test of user3 from External Network
© Khaled Mahmud, 2022